- Secure order
- Easy return shipment
- Service-Hotline +49 4231 668980
Instructions No. 4025
Difficulty: Beginner
Working time: 1 hour


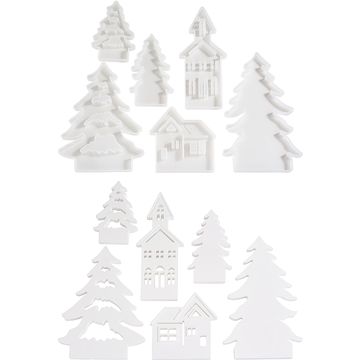
For this winter decoration, pour a small village out of casting compound and then easily snap the individual pieces together later. The interlocking edges ensure that the houses and fir trees stand securely and that you can rearrange the scene at any time.
1. Mix the casting compound: creamy, not runny
Mix the casting compound with water until it reaches a smooth, creamy consistency. “Creamy” means it flows slowly off the mixing stick but still spreads easily in the mold. This way, the mixture fills in fine details neatly and becomes sturdy after drying.
2. Fill the molds and release air bubbles
Pour the mixture into the silicone molds and smooth the surface. Then tap the mold gently all around from the outside. This causes any trapped air bubbles to rise to the top, ensuring the cast pieces will have a nice, smooth surface without small holes later on.
3. Initial drying: Patience for clean edges
Let the filled molds rest for about 1 hour s so the casting mixture can set. During this phase, the material becomes firm enough to be safely removed from the mold later without thin areas breaking off.
4. Demolding: Careful Rather Than Forceful
Gently remove the parts from the silicone mould, by slightly stretching the mold and slowly working the cast piece out. Silicone is flexible—use that to your advantage instead of pulling on the cast part. This keeps windows, roof edges, and the interlocking areas clean.
5. Sanding Edges: For a Professional Finish
Lightly sand any sharp edges with sandpaper . This makes the surface more comfortable to hold, allows the parts to fit more precisely into the interlocking edges, and ensures that your winter decorations look more high-quality overall.
6. Let it dry completely: Stability for your winter decorations
Then let the cast elements dry completely for about 12 hours. Only then will the casting compound be truly sturdy, and you can set up the pieces permanently or decorate them with stickers as needed.
7. Assemble the winter village: Design the scene as you wish
Place the houses and fir trees into the interlocking edges as you like. Thanks to the interlocking system, you can adjust the arrangement at any time.
8. Add lighting: Securely place LED tea lights
Insert four LED tea lights into the designated recesses. LEDs are ideal for this type of tealight holders, because they’re safe and the light beautifully highlights the contours of the winter-themed shapes without generating heat.
9. Optional: Micro-LEDs for a soft glow
You can also place a micro-LED-chain of light around the landscape or attach it to the back of the cast figures. This creates a soft halo of light that makes the houses and fir trees look like they’re part of a small winter landscape.
10. Snow Finale: Diamond Snow for a Wintery Glow
Finally, sprinkle the plate with diamond snow. This gives the scene a crisp winter look and subtly reflects the LED light—perfect if you want to create a modern, bright winter decoration with cast elements.
Your Next Step
If you’d like to cast the winter village in other variations or enhance it with matching lighting, artificial snow, and accessories, you’ll find everything you need in the online shop to bring your winter casting projects to life.